由于Docker官方镜像仓库服务器是在国外,访问时速度比较慢,国内的网易蜂巢等镜像仓库又无法创建私有的镜像仓库,根据公司业务的创建的镜像不可能存放在公开的镜像仓库上;因此想通过搭建私有的镜像仓库用于存储公司业务创建的镜像,目前vmware公司开源的Harbor仓库是国内首选的私有镜像仓库,本文将使用Harbor进行部署安装。
Python需要使用2.7或更高版本
Docker引擎需要使用1.10或更高版本
Docker Compose需要使用1.6.0或更高版本
System version: CentOS Linux release 7.7.1908 (Core)
Python version: Python 2.7.5(CentOS7系统默认2.7以上)
Docker version: Docker version 19.03.5, build 633a0ea
Docker-compose version: docker-compose version 1.25.0, build 0a186604
Harbor version: v1.10.0
(1) 安装python2.7.5
默认CentOS7以上的操作系统自带python2.7以上的版本,若是其他版本的操作系统,请自行Google解决安装。
(2) 安装docker-ce19.03.5
更新系统到最新版并重启生效
关闭防火墙firewalld和selinux
1 2 3 4 systemctl stop firewalld systemctl disable firewalld sed -i 's#SELINUX=enforcing#SELINUX=disabled#g' /etc/selinux/config setenforce 0
安装iptables并启动
1 2 3 4 5 yum install -y iptables-services systemctl start iptables systemctl enable iptables iptables -F service iptables save
使用rpm包方式安装docker-ce,使用以下网址下载docker-ce对应版本的rpm安装包和依赖组件包
下载网址:https://download.docker.com/linux/centos/7/x86_64/stable/Packages/
1 2 3 4 5 6 7 8 9 10 mkdir /opt/docker cd /opt/docker wget https://download.docker.com/linux/centos/7/x86_64/stable/Packages/containerd.io-1.2.6-3.3.el7.x86_64.rpm wget https://download.docker.com/linux/centos/7/x86_64/stable/Packages/docker-ce-cli-19.03.5-3.el7.x86_64.rpm wget https://download.docker.com/linux/centos/7/x86_64/stable/Packages/docker-ce-19.03.5-3.el7.x86_64.rpm yum install -y containerd.io-1.2.6-3.3.el7.x86_64.rpm yum install -y docker-ce-cli-19.03.5-3.el7.x86_64.rpm yum install -y docker-ce-19.03.5-3.el7.x86_64.rpm
启动dockerd进程
1 2 systemctl start docker systemctl enable docker
验证docker是否正常安装并启动
(3) 安装docker-compose1.25.0
下载对应系统版本的docker-compose可执行文件放置到系统环境变量/usr/local/bin下,然后赋予可执行权限
下载网址:https://github.com/docker/compose/releases
1 2 3 4 5 cd /opt/docker wget https://github.com/docker/compose/releases/download/1.25.0/docker-compose-Linux-x86_64 cp -a docker-compose-Linux-x86_64 /usr/local/bin/docker-compose cd /usr/local/bin/ chmod +x docker-compose
验证docker-compose是否安装成功
harbor官方上提供offline和online两个版本,其中offline是带有底层镜像的离线版;online是不包含镜像的在线版,安装的时候会自动去官网拉取镜像;本文建议下载offline版本,减少安装时拉取镜像的时间(网速太慢)。
Harbor官方下载地址:https://github.com/vmware/harbor/releases
下载并解压harbor软件包
1 2 3 4 cd /opt/docker wget https://github.com/goharbor/harbor/releases/download/v1.10.0/harbor-offline-installer-v1.10.0.tgz tar xf harbor-offline-installer-v1.10.0.tgz mv harbor /usr/local
配置harbor.yml文件
1 2 3 4 5 6 7 8 9 10 11 12 13 14 15 16 17 18 19 20 21 22 23 cd /usr/local/harbor vim harbor.yml #必选参数 #set hostname hostname: hub.itunion.com #目标的主机名或者完全限定域名 # http related config http: # port for http, default is 80. If https enabled, this port will redirect to https port port: 80 # https related config https: # https port for harbor, default is 443 port: 443 # The path of cert and key files for nginx certificate: /data/cert/service.crt private_key: /data/cert/service.key # Harbor DB configuration database: # The password for the root user of Harbor DB. Change this before any production use. password: root123
为Harbor创建https服务端证书和密钥
1 2 3 4 5 6 7 8 9 10 11 12 13 14 15 16 17 18 19 20 21 22 23 24 25 26 27 28 29 30 31 32 33 34 35 36 37 38 39 mkdir -p /data/cert cd /data/cert #获取CA证书 openssl genrsa -out ca.key 4096 #获取CA证书密钥,其中CN的值为你要申请证书的域名(hub.itunion.com换成你的域名) openssl req -x509 -new -nodes -sha512 -days 3650 \ -subj "/C=CN/ST=Beijing/L=Beijing/O=itunion/OU=Personal/CN=hub.itunion.com" \ -key ca.key \ -out ca.crt #创建服务端证书密钥 openssl genrsa -out service.key 4096 #生成服务端证书申请文件,其中CN的值为你要申请证书的域名(hub.itunion.com换成你的域名) openssl req -sha512 -new \ -subj "/C=CN/ST=Beijing/L=Beijing/O=itunion/OU=Personal/CN=hub.itunion.com" \ -key service.key \ -out service.csr #生成注册表主机证书 cat > v3.ext <<-EOF authorityKeyIdentifier=keyid,issuer basicConstraints=CA:FALSE keyUsage = digitalSignature, nonRepudiation, keyEncipherment, dataEncipherment extendedKeyUsage = serverAuth subjectAltName = @alt_names [alt_names] DNS.1=hub.itunion.com DNS.2=hub.itunion DNS.3=hostname EOF #通过CA证书密钥和服务端证书申请文件生成服务端证书 openssl x509 -req -sha512 -days 3650 \ -extfile v3.ext \ -CA ca.crt -CAkey ca.key -CAcreateserial \ -in service.csr \ -out service.crt
为Docker配置服务端证书、密钥和CA证书
1 2 3 4 5 #将服务端证书service.crt转换为service.cert openssl x509 -inform PEM -in service.crt -out service.cert #创建docker存放服务端证书的目录并复制自定义证书、密钥和CA证书到指定目录下,该目录hub.itunion.com和harbor.yml配置文件中的hostname必须一致 mkdir -p /etc/docker/certs.d/hub.itunion.com cp service.cert service.key ca.crt /etc/docker/certs.d/hub.itunion.com
运行harbor安装脚本
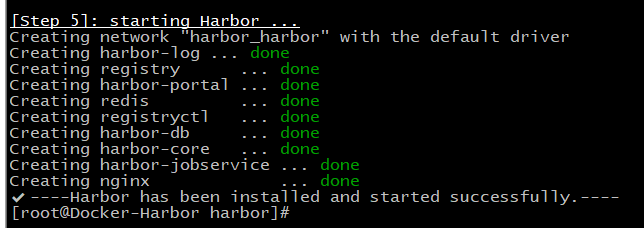
1 2 cd /usr/local/harbor ./install.sh
安装完成后,返回如下图所示,表示安装成功。
测试访问harbor仓库web页面
以Windows为例,先配置hosts解析,编辑 C:\Windows\System32\drivers\etc\hosts 文件,添加如下内容:
注:如果域名有dns解析,这一步可以省略
1 192.168.1.222 hub.itunion.com
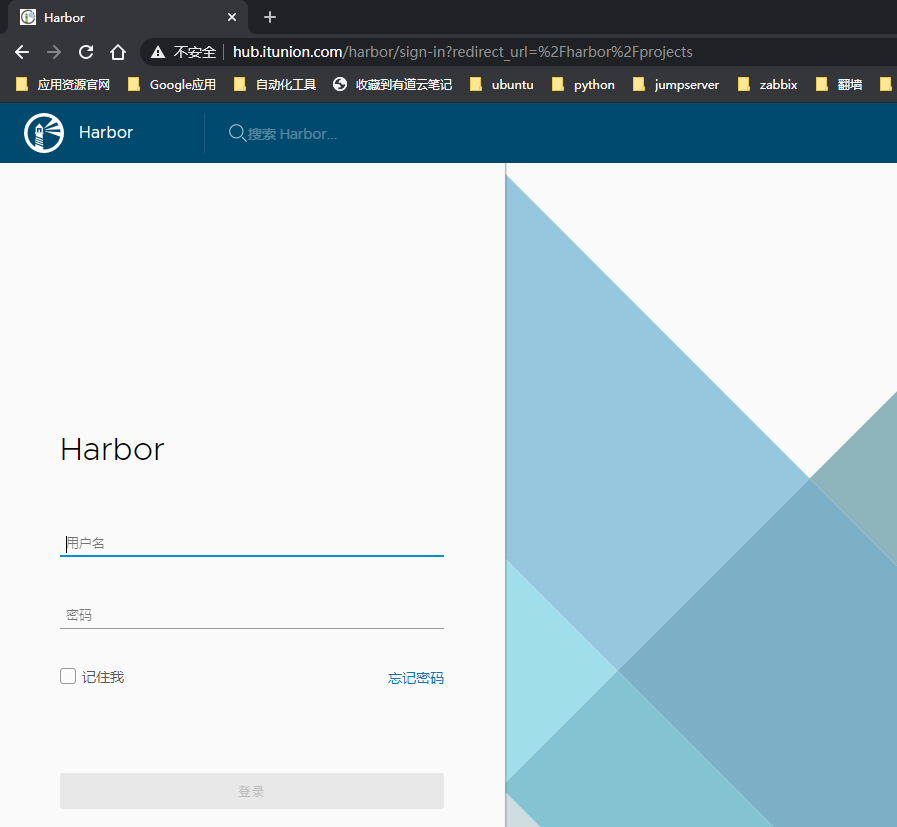
浏览器输入https://hub.itunion.com测试访问(将hub.itunion.com更改为你的harbor.yml配置文件中的主机名),其中管理员默认用户名为admin,默认密码为Harbor12345,如下图所示:
附:停止或启动harbor仓库命令
1 2 3 cd /usr/local/harbor #切换到harbor安装目录下 docker-compose stop #停止harbor仓库 docker-compose up -d #后台启动harbor仓库
配置hosts解析
以CentOS系统为例,修改/etc/hosts配置文件,执行以下命令,如下所示:
注:如果域名有dns解析,这一步可以省略
1 echo '192.168.1.221 hub.itunion.com' >>/etc/hosts
设置私有镜像仓库地址
1 2 3 4 vim /etc/docker/daemon.json { "insecure-registries":["hub.itunion.com"] }
重新加载配置并重启docker服务
1 2 systemctl daemon-reload systemctl restart docker
下载测试镜像
给镜像重新打标签
1 docker tag hello-world:latest hub.itunion.com/base/hello-world:v1.0
注:其中 hello-world:latest 为源镜像名:版本号
hub.itunion.com/base/hello-world:v1.0 为目标仓库地址/仓库名/镜像名:版本号
登录私有镜像仓库上传镜像
1 2 docker login https://hub.itunion.com #需要输入仓库的用户名和密码 docker push hub.itunion.com/base/hello-world:v1.0 #推送到私有仓库的镜像
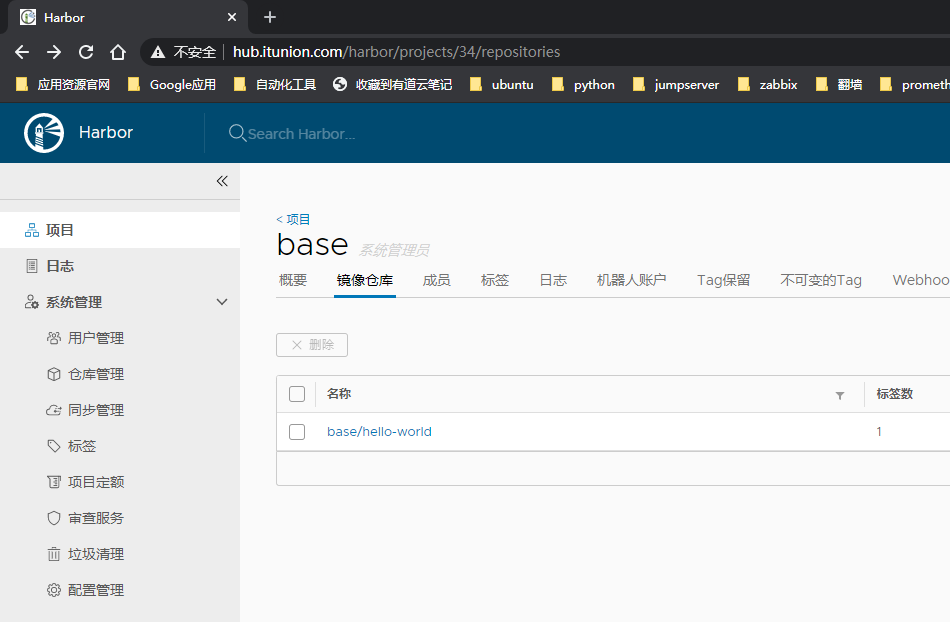
登录harbor仓库web页面查看上传的镜像,如下图所示,镜像上传成功。